
Secondary Air Injection System Removal
It doesn't take long for a new Bonnie to start turning its header pipes blue, especially if it's been re-jetted, and it doesn't take long for a new Bonnie owner to notice that it's popping an awful lot on the over-run. Both are partly symptomatic of unburnt fuel igniting in the exhaust ports and, occasionally, further through the exhaust system - largely caused by the secondary air injection system.
So what's it there for? It doesn't add anything to the Bonnie's performance or aesthetics and it certainly doesn't make changing the spark plugs any easier. Okay, here's how Triumph justify the existence of this particular piece of junk they've bolted onto an otherwise sensible motorcycle...
"The secondary air injection system reduces the level of pollutants emitted in the exhaust gases. The system is operated by the control valve assembly located under the fuel tank and functions as follows.
When the engine is running, the vacuum present in the intake port opens up the control valve diaphragm. Every time there is a negative pulse in the exhaust port, the control valve then allows clean air to be drawn from the airbox into the port. This air causes secondary combustion of the exhaust gases in the exhaust ports, reducing the amount of unburnt hydrocarbons released into the atmosphere in the exhaust gases.
The control valve assembly contains two reed valve assemblies (one for each cylinder) to prevent the exhaust gases travelling from the exhaust port back to the airbox."
It rather strikes me that the best way to prevent unburnt hydrocarbons entering the atmosphere is to establish a correct air/fuel mix in the carburettors rather than risk sending burning exhaust gases back under your fuel tank and into your air-box, should either of the reed valves fail. Not a huge risk, granted (infinitesimally small actually), but sod it all the same - it is the conceptual epitome of "low risk" versus "high hazard". I, for one, would feel rather bad about polluting the atmosphere by suddenly becoming a sixty mph fireball hurtling down the road, strewing the verges with my charred personal proteins and hydrocarbons.
No - bin the sodding thing - no risk, no hazard!
Oh alright, maybe I over-egged the pudding a bit on that particular point but the fact remains that it is still more than a little extraneous to the workings of the Bonnie. Not for nothing is its removal one of the first and most common modifications to be performed. I ripped mine out straight away.
Sure, you want to get shot of yours too - but you don't have to spend a load of cash on an over-priced after-market "Air Injection Removal Kit". All you need are: a pair of sump bolts from a Suzuki SV650, Nissan Bluebird or similar (M12 X 1.25); an inlet manifold vacuum port cap (VAC 01), and; a half inch diameter (13mm) plug or bung for the hole in the top left of the stock air-box - I used a whittled down wine cork. All told, certainly no more than a fiver's worth, if that.
There are a few minor variations in the detail of its removal, all of which amount to pretty much the same thing. Briefly, here's how I did it...
Having removed the fuel tank, detach the black pipes [see below - 7] from the the two chromed tubes [10] next to the spark plugs - you'll need to release the small oetiker clips [9]. Then undo the chromed tubes from the head using a 13mm ring spanner - retaining the copper washers at their bases [16]. Discard the tubes and replace them with the sump bolts, remembering to fit the copper washers removed from the tubes.
Disconnect the ribbed plastic tube [5] from the left side inlet manifold vacuum port, located between the left side carb and the engine, and replace it with the port cap. As an alternative, it has been suggested that the balance of the carbs might be improved by keeping the tube in place on the left side vacuum port and connecting the reed valve end of the ribbed tube to the vacuum port on the right manifold, though I, personally, am yet to be convinced as to the effectiveness of this.
Pull the feed pipe [11] out of the top left of the air-box and replace that with the bung, using a little silicone sealant to effect an air-tight seal, should you deem it necessary.
The AI system is now, essentially, removed from the workings of the bike. All you need to do now is unbolt the reed valve assembly [1] from the frame above the cam cover, throw it at a passing cat/dog/politician (whatever) and that's it.
Exploded view (appositely) of the secondary air injection system
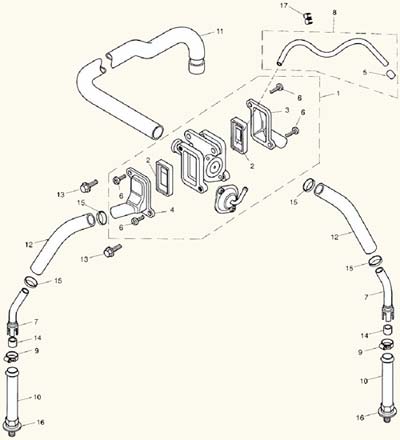
1. Reed valve assembly
2. Reed valve
3. Reed valve cover (RH)
4. Reed valve cover (LH)
5. Vacuum line restrictor (SAI)
6. Screw (M5, SAI)
7. Castellated tube assembly (8 ID, 12.7 OD)
8. Vacuum line assembly (447LG)
9. Oetiker stepless hose clip
10. Chrome plated pipe (M12 X 8mm ID)
11. Secondary air injection feed pipe
12. Formed air hose (9.5mm ID)
13. Bolt (RHHF, M6 X 1.0 X 16)
14. Seal (10mm ID, 16mm OD, L20)
15. Breather pipe clip
16. Washer (12 X 18 X 1)
17. Twin clip


